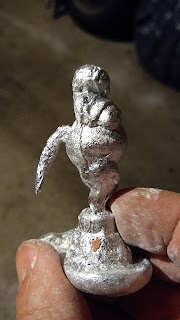
It worked! Aluminum Session No.6
Finally, March 9, a few days before the Covid shutdown, we got ourselves some half-decent aluminum castings!
This time, for the molds, we remembered to mix the plaster with sand and added vents, even if perhaps the patterns didn't need them. We didn't design the molds to have the metal melt directly in a basin though; we went with our traditional casting-from-a-tin-can method instead.
The kiln was quite stacked with four molds, bricks to deflect the flame, and the crucible-soup can with the aluminum.
We started low and went nice and slow in order to melt out the residual wax. Around 300° C you could smell a faint wax smell, so this was a good sign. (Another good sign was the garage smoke detector going off; at least we know that works well.)
 |
| (I opened the garage door a bit more afterwards.) |
We stayed stable around 400° C by the first hour or so, and then increased to 500° over the next hour, and then reached 600° the following hour. By this time a crack was visible in the top of the mold.
From previous melts it seems the kiln pyrometer needs to reach about 800° for the aluminum to melt, so after our third hour we climbed more quickly to approach that figure. And then we poured.
 |
| A suspicious blob |
I was pretty sure none of these would work since the metal didn't seem to flow in very well, as you can see above. And here it seems to have mostly spilled off the edge...
and this crack looks pretty big...
This one was too cracked to even bother with.
So you can imagine my surprise when I cracked open the first one:
and then the second one:
even the third one came out to some degree, tail-vent and all.
(The vent was blocked by some left over clay which I had missed and not removed, but no matter. You can see the seam running down her side from the crack in the mold, and an air pocket deformation below the knees.)
I was very pleased that two came out well enough to finish and buff up. The plan now is to make one large mold with gates to multiple Venuses and vents and a cup to hold the ingot, so it melts and flows directly without having to pour it ourselves. In other words, a fully fledged gated whoozamadingy! Oh, and I'll add some chicken wire inside the plaster mold to help keep it bound together, as advised (once again) by the Mikebudian master Csefko T. Stay tuned.


Comments
Post a Comment