
Crossed Fingers and Lumpy Lingams (Al Casting Session No. 5)
In this round of mold-making and casting (09 Feb 2020), we were supposed to learn from our previous mistakes and remember to:
i) add sand to the plaster mix, in a ratio of around 1:3 or 1:4 (the sand from my daughter's sandbox was wet so it was hard to tell)
ii) make molds with large pouring basins and vents


iii) burn out the wax from the molds longer and hotter
And if we remembered to do all this, it was all gonna work great.
Well, it was yet again another wonderful example of "the best laid schemes", or of how processes really work. Or in other words, what happens when you chat too much and don't pay attention. Look at this ugly mold!

If the Crafts as taught by Silo are aimed at helping one to develop an internal attitude of permanence, of care with the work, and of proportion, I'd say we blew it with Care this time. We remembered to add sand to the plaster, but we didn't pay enough attention while doing it so when we went to pour it, it was already too thick! We hoped it would work, but (no surprise) it didn't:
So, hoping against hope that somehow your molds will turn out perfectly contrary to all indications, we proceeded to cast them anyway. (This is known as the technique of the "Crossed Fingers.")
We filled in the molds with pieces of aluminum...

...put them in the kiln and raised the temperature very slowly, to make sure any residual wax would burn out.

We went to about 375° C in about 30 minutes, and then kept going slowly up to 450°. There was a clear but light wax smell during this time, but after about an hour the smell disappeared, so we figured they were now good and clean. We kept raising the temperature slowly in roughly 50° increments, so as to not shock the molds. We ate some pasta while waiting, and Laika waited with us (or waited for ravioli, that is).

And then around the two hour mark, we started giving it more heat. With the pyrometer reading 800°, the metal started to melt. We took it up to 825° and let it sit for 20 minutes (but should have waited longer).
Results:
In programming it's called, "Garbage In, Garbage Out." In mold-making, it's also known as: "If You Make a Crappy Mold, You Get a Crappy Copy." So sure enough, both yoni-lingam figures came out totally lumpy (lumpy-lingams)...

...and you can see gaps in the molds resulting from the pouring of the lumpy plaster:

The Venus didn't work, in part because we may have confused the vent with the pouring cup when we made the mold:
And the salamander didn't work, perhaps because the metal in the mold didn't reach the right temperature. That is, all the little bits melted a little but didn't fuse together. We're not entirely sure why - maybe one bigger piece would work better than trying to meld together a bunch of itty, bitty bits, or maybe if we had waited longer (or gone higher with temperature), it would have finally flowed together.

The good news is that, next time, for sure it'll all work! Ha ha. No, really. The molds held up well in the heat, the metal melted and entered the cavities fairly well in the larger molds, and in the smaller ones we need to reconsider the size of the pouring cups and placement of vents.
On we go. And next time, a little more Care while mixing the plaster!
i) add sand to the plaster mix, in a ratio of around 1:3 or 1:4 (the sand from my daughter's sandbox was wet so it was hard to tell)


ii) make molds with large pouring basins and vents


iii) burn out the wax from the molds longer and hotter
 |
| molds cooking away in toaster oven |
 |
| a good amount of wax was recouped |
 |
| after first burnout for a few hours at 200° C |
And if we remembered to do all this, it was all gonna work great.
Well, it was yet again another wonderful example of "the best laid schemes", or of how processes really work. Or in other words, what happens when you chat too much and don't pay attention. Look at this ugly mold!

If the Crafts as taught by Silo are aimed at helping one to develop an internal attitude of permanence, of care with the work, and of proportion, I'd say we blew it with Care this time. We remembered to add sand to the plaster, but we didn't pay enough attention while doing it so when we went to pour it, it was already too thick! We hoped it would work, but (no surprise) it didn't:
 |
| see those gaps on the outside? what are the chances the inside will be perfect? |
So, hoping against hope that somehow your molds will turn out perfectly contrary to all indications, we proceeded to cast them anyway. (This is known as the technique of the "Crossed Fingers.")
We filled in the molds with pieces of aluminum...

...put them in the kiln and raised the temperature very slowly, to make sure any residual wax would burn out.

We went to about 375° C in about 30 minutes, and then kept going slowly up to 450°. There was a clear but light wax smell during this time, but after about an hour the smell disappeared, so we figured they were now good and clean. We kept raising the temperature slowly in roughly 50° increments, so as to not shock the molds. We ate some pasta while waiting, and Laika waited with us (or waited for ravioli, that is).

And then around the two hour mark, we started giving it more heat. With the pyrometer reading 800°, the metal started to melt. We took it up to 825° and let it sit for 20 minutes (but should have waited longer).
 |
| molten Al in the molds |
Results:
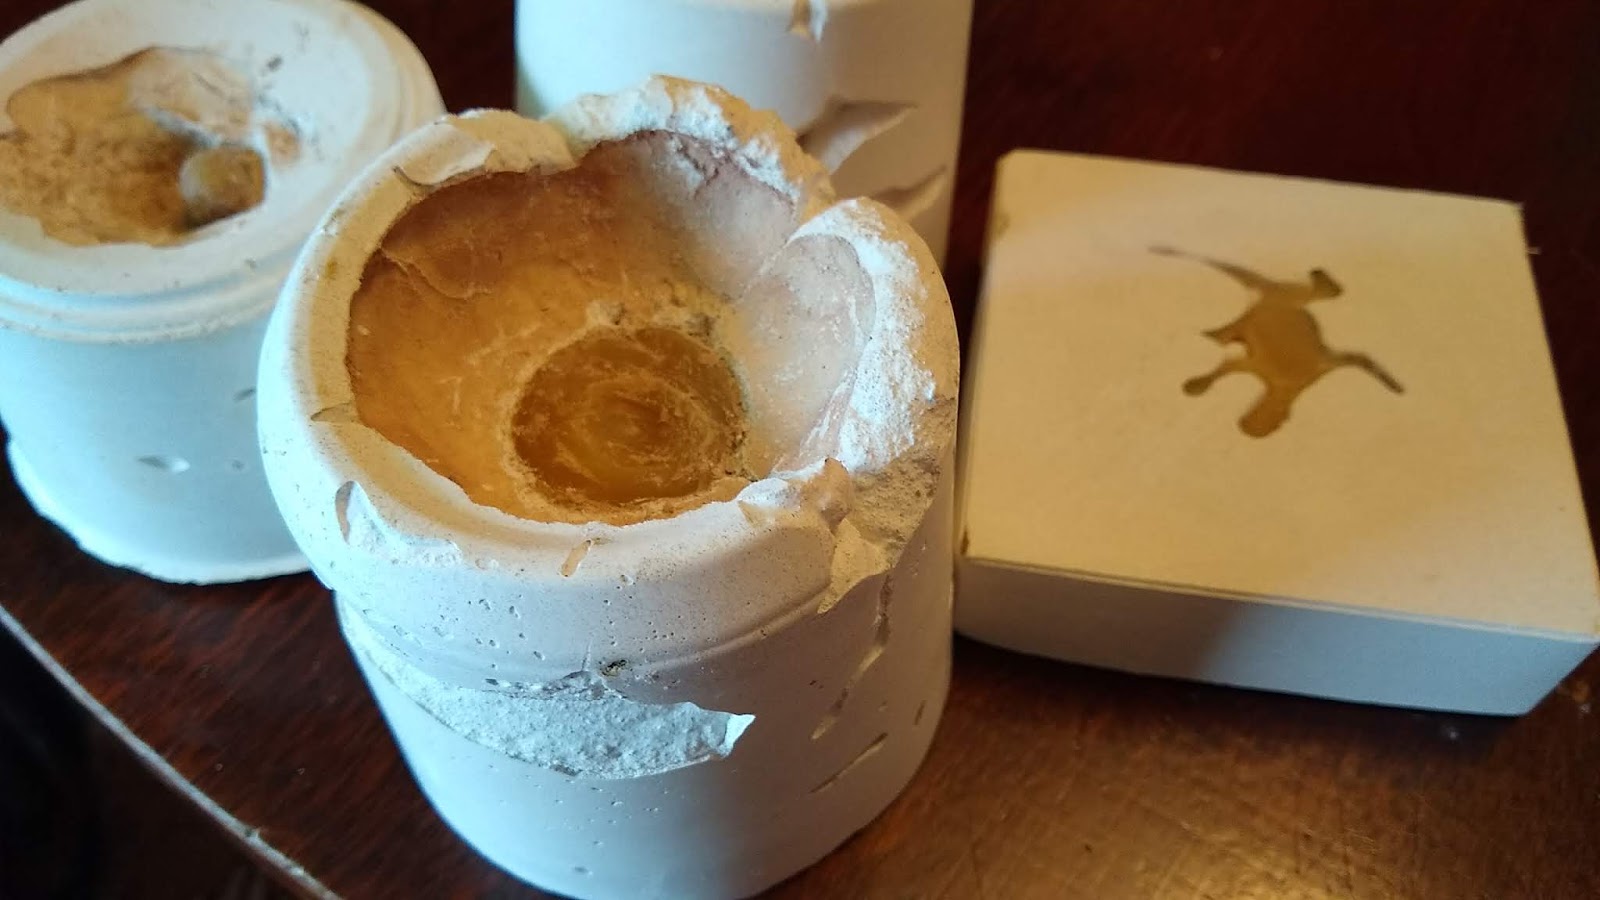
In programming it's called, "Garbage In, Garbage Out." In mold-making, it's also known as: "If You Make a Crappy Mold, You Get a Crappy Copy." So sure enough, both yoni-lingam figures came out totally lumpy (lumpy-lingams)...

...and you can see gaps in the molds resulting from the pouring of the lumpy plaster:

The Venus didn't work, in part because we may have confused the vent with the pouring cup when we made the mold:
 |
| lump of Venus |
And the salamander didn't work, perhaps because the metal in the mold didn't reach the right temperature. That is, all the little bits melted a little but didn't fuse together. We're not entirely sure why - maybe one bigger piece would work better than trying to meld together a bunch of itty, bitty bits, or maybe if we had waited longer (or gone higher with temperature), it would have finally flowed together.

The good news is that, next time, for sure it'll all work! Ha ha. No, really. The molds held up well in the heat, the metal melted and entered the cavities fairly well in the larger molds, and in the smaller ones we need to reconsider the size of the pouring cups and placement of vents.
On we go. And next time, a little more Care while mixing the plaster!
Thanks for the very exhaustive description of the processes and shortcomings. And I think I was a bit too chatty...so next time. As soon as July for me. Hugs
ReplyDelete